欢迎关注微信公众号「Swift 花园」
用 SwiftUI 在 Apple Watch 上构建动态通知
译自 Dynamic user notification on Apple Watch with SwiftUI WaterMyPlants
集成了推送或者本地通知的 app 可以定制 apple watch 上的通知。本文是关于如何在 apple watch 上实现动态通知的笔记。样例工程实现一个提醒给植物浇水的功能。我们会聚焦在添加通知视图,省略从 iOS app 发送通知的步骤。
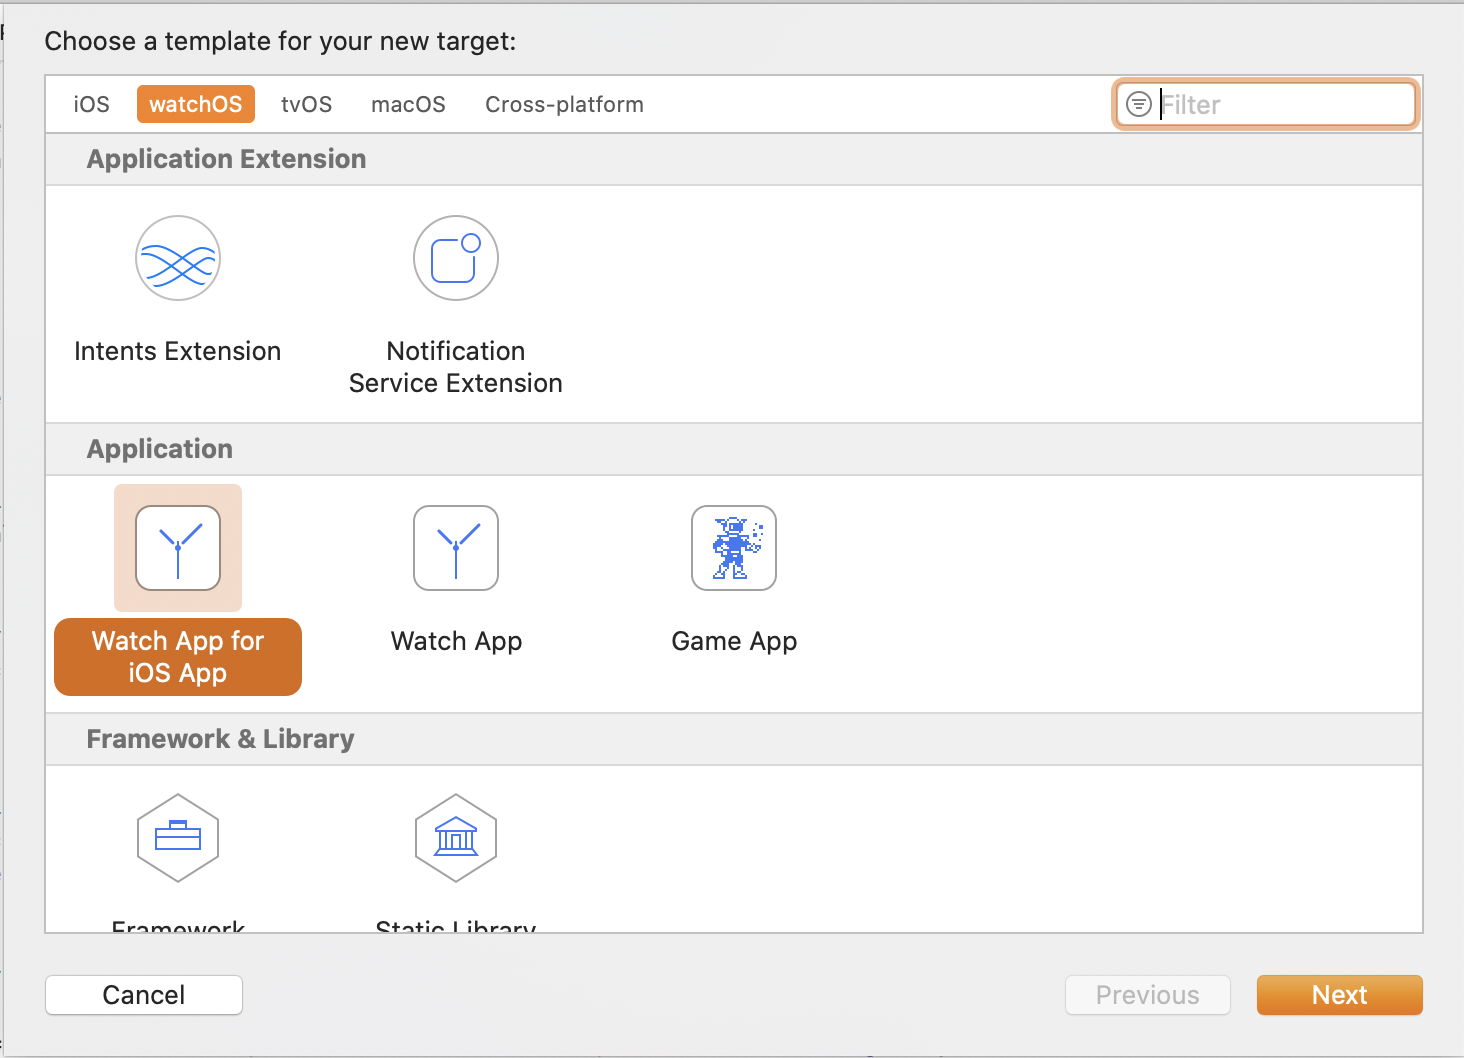
为 Apple Watch 添加富文本通知添加构建目标 如果工程里没有 App Watch app ,你需要添加它。在 Xcode 中,我们新增一个构建目标,并配置成包含通知场景。打开 New -> Target:
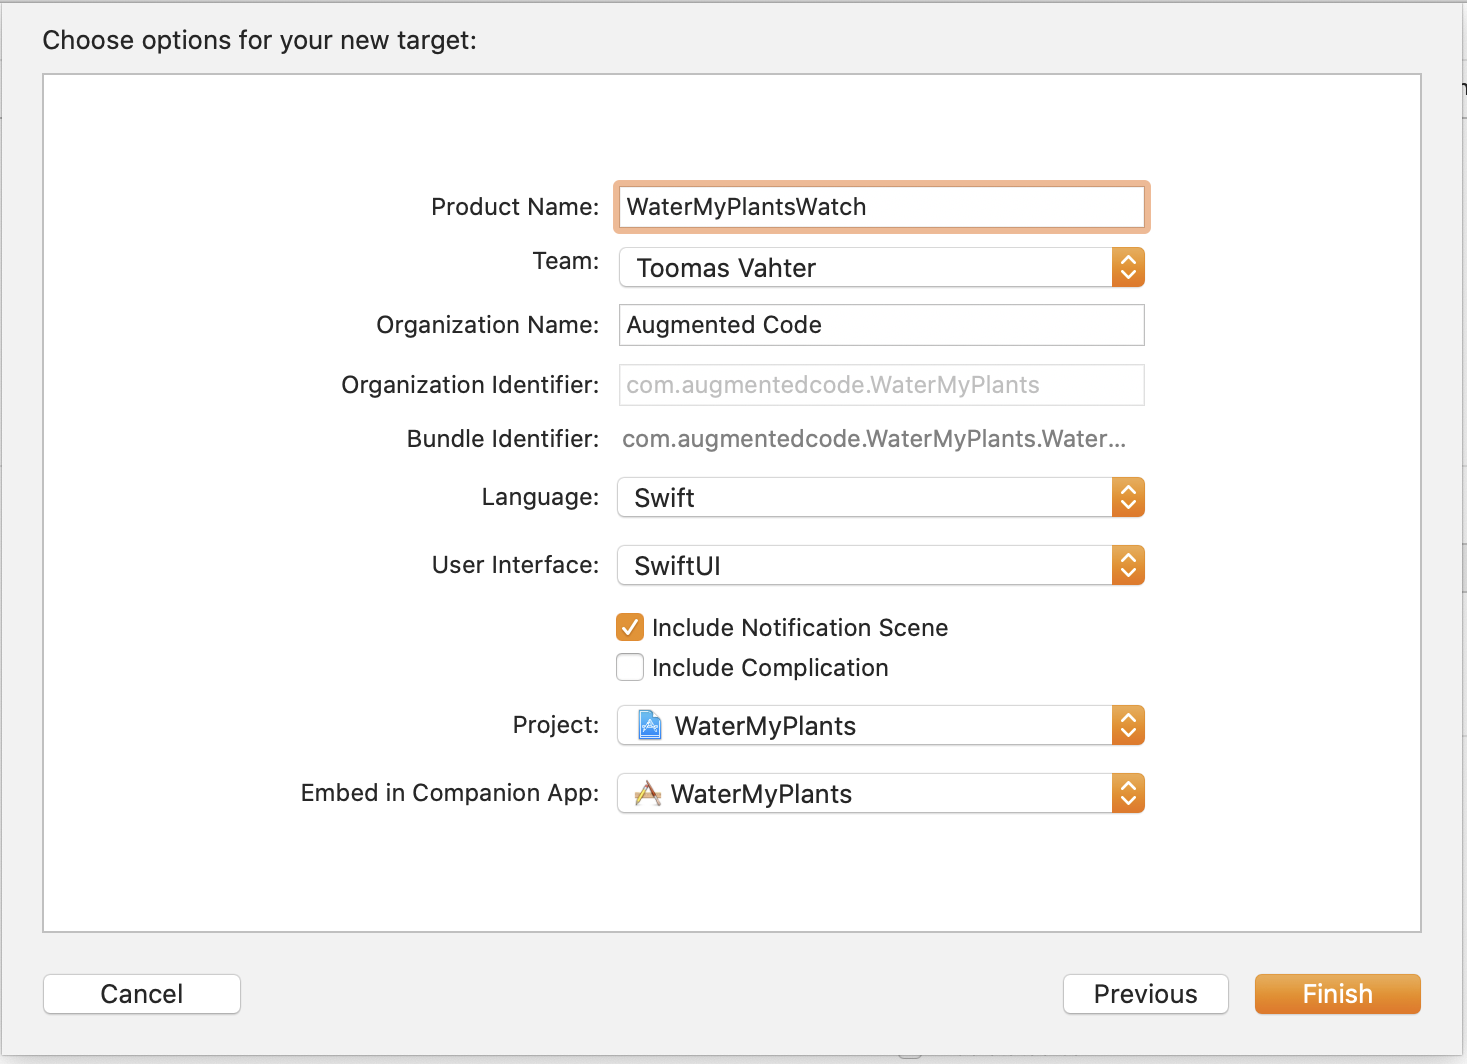
确保 User Interface 选择,并且 “Include Notification Scene” 选中。我们将会把它嵌入当前的 iOS app ,所以 “Embed in Companion App” 要选择当前 app 。值得一提的是,从 iOS 13 和 WatchOS 6 开始,Apple Watch app 已经可以独立存在了。
点击完成,Xcode 会询问激活新的 scheme ,点击激活,它会自动选择新建的目标,所以我们可以直接开始写代码了。先检查工程,会发现 Xcode 加了两个目标:watch app 和 extension。App 包含了 storyboard ,而 extension 包含了所有的代码。 storyboard 是提供基于 WKHostingController 的子类的 HostingController 演示用的场景。这个类负责承载你的 Apple Watch app 的 SwiftUI 视图。另外,还有两个场景,分别是静态和动态通知。我们对动态通知感兴趣,在 storyboard 里可以看见动态视图是由 NotificationController 提供的,它是 WKUserNotificationHostingController 的子类,承载通知的 SwiftUI 视图。这里就是我们给通知提供自定义界面的地方。如果通知的分类和 storyboard 里预先定义的匹配,就会选择动态通知视图。
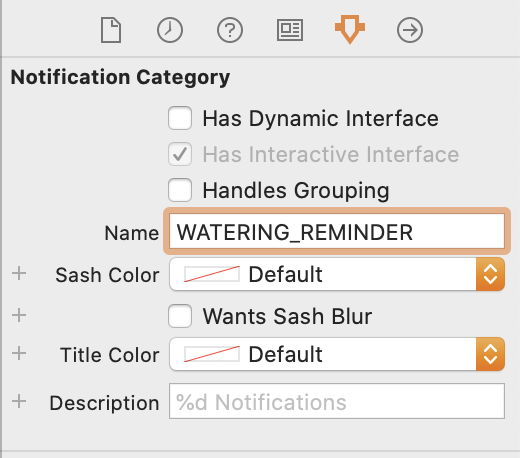
解析通知的 payload 并设置动态通知视图 NotificationController 的职责是消费用户通知的 payload ,并生成 SwiftUI 视图来展示它们。用户通知是从 didReceive 函数接收的,我们需要释放信息,用于视图。在本地测试的时候,我们可以把测试数据写在 PushNotificationPayload.apns 文件里。因为我们要展示的是关于植物的信息,所有我们添加一个植物对象到文件中。同时,我们还需要把通知分类修改成某个有含义的字符串。确保你设置新的分类时正确更新 storyboard 。
1
2
3
4
5
6
7
8
9
10
11
12
13
14
15
16
17
18
{ "aps" : { "alert" : { "body" : "Test message" , "title" : "Optional title" , "subtitle" : "Optional subtitle" }, "category" : "WATERING_REMINDER" , "thread-id" : "plantid123" }, "plant" : { "id" : "plantid123" , "name" : "Aloe" , "lastDate" : 1579937802 , "nextDate" : 1580515200 } }
当我们访问 UNNotification.request.content.userInfo 拿到植物的信息时,我们可以用 Decodable 和 JSONDecoder 将代表植物的字典转换成值类型。 JSONDecoder 接收 JSON 数据,所以我们先用 JSONSerialization 包装数据,然后把包装的结果传给 JSONDecoder 。 或者我们也可以手动从 userInfo 字典里读取所有的值,然后创建出植物类型。留意,我们需要用 view model 来提供数据给 SwiftUI ,而不是直接使用 Plant 类型。
1
2
3
4
5
6
7
8
9
10
11
12
13
14
15
16
17
18
struct Plant : Decodable let id: String let name: String let lastDate: Date let nextDate: Date } do { let plantInfo = notification.request.content.userInfo ["plant" ] as ! [String : Any ] let data = try JSONSerialization .data (withJSONObject: plantInfo, options: []) let decoder = JSONDecoder () decoder.dateDecodingStrategy = .secondsSince1970 let plant = try decoder.decode (Plant .self , from: data) viewModel = NotificationViewModel (plant: plant) } catch let nsError as NSError { print (nsError.localizedDescription) }
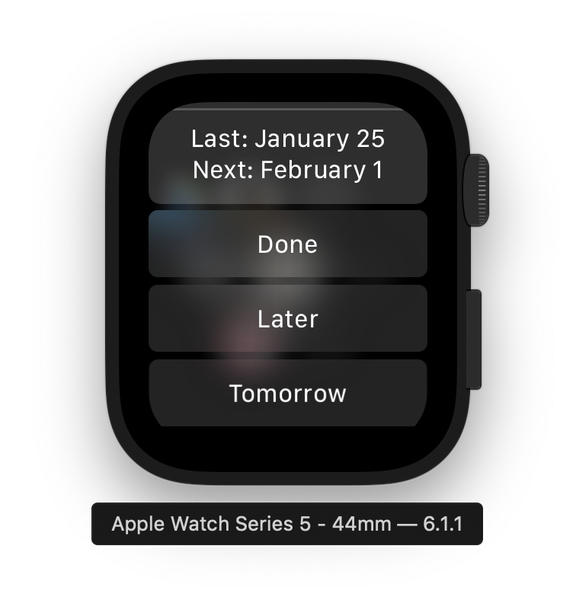
另外,我们想要添加三个用户可以执行的动作:标记植物已经浇水,推后提醒,或者安排明天再提醒。这些动作是用 UNNotificationAction 实例表示。当用户点击任意其中一个时,UNUserNotificationCenter 的委托方法会被调用,并且带有该动作的 identifier 。
1
2
3
4
5
6
7
8
let doneTitle = NSLocalizedString ("NotificationAction_Done" , comment: "Done button title in notification." )let laterTitle = NSLocalizedString ("NotificationAction_Later" , comment: "Later button title in notification." )let tomorrowTitle = NSLocalizedString ("NotificationAction_Tomorrow" , comment: "Tomorrow button title in notification." )notificationActions = [ UNNotificationAction (identifier: "water_done" , title: doneTitle, options: []), UNNotificationAction (identifier: "water_later" , title: laterTitle, options: []), UNNotificationAction (identifier: "water_tomorrow" , title: tomorrowTitle, options: []) ]
NotificationController 的完整实现如下:
1
2
3
4
5
6
7
8
9
10
11
12
13
14
15
16
17
18
19
20
21
22
23
24
25
26
27
28
29
30
final class NotificationController : WKUserNotificationHostingController <NotificationView > private var viewModel: NotificationViewModel? override var body: NotificationView { return NotificationView (viewModel: viewModel!) } override func didReceive (_ notification: UNNotification) do { let plantInfo = notification.request.content.userInfo ["plant" ] as ! [String : Any ] let data = try JSONSerialization .data (withJSONObject: plantInfo, options: []) let decoder = JSONDecoder () decoder.dateDecodingStrategy = .secondsSince1970 let plant = try decoder.decode (Plant .self , from: data) viewModel = NotificationViewModel (plant: plant) } catch let nsError as NSError { print (nsError.localizedDescription) } let doneTitle = NSLocalizedString ("NotificationAction_Done" , comment: "Done button title in notification." ) let laterTitle = NSLocalizedString ("NotificationAction_Later" , comment: "Later button title in notification." ) let tomorrowTitle = NSLocalizedString ("NotificationAction_Tomorrow" , comment: "Tomorrow button title in notification." ) notificationActions = [ UNNotificationAction (identifier: "water_done" , title: doneTitle, options: []), UNNotificationAction (identifier: "water_later" , title: laterTitle, options: []), UNNotificationAction (identifier: "water_tomorrow" , title: tomorrowTitle, options: []) ] } }
呈现通知的 NotificationView 上面提到 view model NotificationViewModel 为 NotificationView 提供文本,它主要处理日期的格式化字符。
1
2
3
4
5
6
7
8
9
10
11
12
13
14
15
16
17
18
19
20
21
22
23
24
25
26
27
28
29
30
31
struct NotificationViewModel private let plant: Plant init (plant: Plant ) { self .plant = plant } var title: String { return plant.name } var subtitle: String { return NSLocalizedString ("NotificationView_Subtitle" , comment: "Notification suggestion text" ) } private let dateFormatter: DateFormatter = { let formatter = DateFormatter () formatter.dateFormat = DateFormatter .dateFormat (fromTemplate: "dMMMM" , options: 0 , locale: .current) return formatter }() var lastWatering: String { let format = NSLocalizedString ("NotificationView_LastWatering" , comment: "Last watering date." ) return String (format: format, dateFormatter.string (from: plant.lastDate)) } var nextWatering: String { let format = NSLocalizedString ("NotificationView_NextWatering" , comment: "Next watering date." ) return String (format: format, dateFormatter.string (from: plant.nextDate)) } }
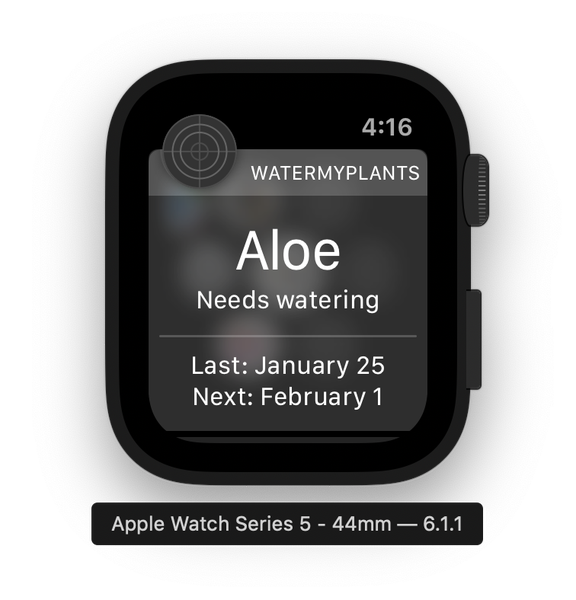
SwiftUI 视图很简单,4 个文本。
1
2
3
4
5
6
7
8
9
10
11
12
13
struct NotificationView : View let viewModel: NotificationViewModel var body: some View { VStack { Text (viewModel.title).font (.title) Text (viewModel.subtitle).font (.subheadline) Divider () Text (viewModel.lastWatering).font (.body).multilineTextAlignment (.center) Text (viewModel.nextWatering).font (.body).multilineTextAlignment (.center) } } }
小结 我们往一个 iOS app 中添加了 watch app ,实现一个通知分类的动态通知视图。我们学习了如何解析通知数据,添加动作按钮。下一步是在 companion iOS app 里基于按钮的 identifier 处理对应通知动作。
拉取和显示数据 这一节的主题是从 compasion iOS app 的 CoreData 存储中获取数据,需要借助 WatchConnectivity framework 。
iOS 和 WatchOS app 之间的 session iOS app 用 CoreData 来存储植物列表,记录了每株植物上一次和下一次浇水的日期。在这里,没有 web 服务,所有的东西都存在设备上。那么如何把持久化存储中的数据拿给 WatchOS app 使用呢?
我们会用到 WatchConnectivity framework 来做 iOS 和 WatchOS app 之间的交互。连接是在 iOS 和 WatchOS app 上都激活 WCSession 来实现的。因此,第一步是添加一个管理 WCSession 的类到 iOS 工程,我们不妨称它为 WatchConnectivityProvider (稍后也会添加一个相似的类到 WatchOS app)。它的主要职能是建立 WCSession ,处理 WCSessionDelegate ,其中包含从 CoreData 存储拉取数据。因此,有一个叫 NSPersistentContainer 的参数会提供对 CoreData 栈的访问 (借由访问 performBackgroundTask 函数)。
1
2
3
4
5
6
7
8
9
10
final class WatchConnectivityProvider : NSObject , WCSessionDelegate private let persistentContainer: NSPersistentContainer private let session: WCSession init (session: WCSession = .default , persistentContainer: NSPersistentContainer ) { self .persistentContainer = persistentContainer self .session = session super .init () session.delegate = self }
WCSession 是通过调用 activate () 来激活,激活过程是异步的。激活的响应通过 session (_:activationDidCompleteWith:error:) 委托访问返回。
1
2
3
4
5
6
7
8
9
10
11
12
13
14
15
16
17
func connect () guard WCSession .isSupported () else { os_log (.debug, log: .watch, "watch session is not supported" ) return } os_log (.debug, log: .watch, "activating watch session" ) session.activate () } func session (_ session: WCSession, activationDidCompleteWith activationState: WCSessionActivationState, error: Error?) os_log (.debug, log: .watch, "did finish activating session % lu (error: % s)" , activationState == .activated, error?.localizedDescription ?? "none" ) }
在 watchOS extension target 那边,我们会添加相似的代码,不过名字不一样,叫 “PhoneConnectivityProvider” 。当两个类都创建完成后,我们需要初始化并调用 connect ,分别在 SceneDelegate (iOS) 和 ExtensionDelegate (watchOS) 中完成。注意,在 iOS app 这边,我们需要实现两个委托方面,不过目前我们简单打印就可以了。
1
2
3
4
5
6
7
func sessionDidBecomeInactive (_ session: WCSession) os_log (.debug, log: .watch, "session became inactive" ) } func sessionDidDeactivate (_ session: WCSession) os_log (.debug, log: .watch, "session deactivated" ) }
为了测试 session ,我们需要先编译并运行,然后在编译运行 watchOS app 。如果一切工作正常, Xcode 调试窗口会打印出消息: “did finish activating session 1 (error: none)”. 这表明 session 已经建立并且正在运行,我们可以两个 app 间发送消息了。
Fetching plants from iOS app 因为 iOS 和 watchOS app 之间的通信依赖字典,所以第一步是定义一组两个 app 共享使用的 key 。这样可以减少误拼写的风险,所以我们可以添加新文件,并且同时包含到 iOS app target 和 watchOS extension target 中去。
1
2
3
4
5
6
7
8
struct WatchCommunication static let requestKey = "request" static let responseKey = "response" enum Content : String case allPlants } }
第二步是在 PhoneConnectivityProvider (watchOS app extension target) 中实现一个 refreshAllPlants (completionHandler) 函数,用来发送消息给 iOS app ,并且等待植物数据的数组返回。 WCSession 有一个叫 sendMessage (_:replyHandler:errorHandler:) 的函数,我们可以用它来发送一个字典给 iOS app ,然后等待 reply handler 。我们会用 WatchCommunication.requestKey 和 WatchCommunication.Content.allPlants 枚举的 rawValue 来构建消息。这种模式便于后续扩展,你只要添加更到 case 到枚举就可以了。在 reply handler 中,我们期望得到一个字典的数组,描述所有的植物。让我们先看一眼完整的实现,然后再讨论字典是如何被转换成 Plant 值类型的。
1
2
3
4
5
6
7
8
9
10
11
12
13
14
15
16
17
18
19
20
21
func refreshAllPlants (withCompletionHandler completionHandler: @escaping ([Plant]?) Void ) { guard session.activationState == .activated else { os_log (.debug, log: .phone, "session is not active" ) completionHandler (nil ) return } let message = [WatchCommunication .requestKey: WatchCommunication .Content .allPlants.rawValue] session.sendMessage (message, replyHandler: { (payload) in let plantDictionaries = payload [WatchCommunication .requestKey] as ? [[String : Any ]] os_log (.debug, log: .phone, "received % lu plants" , plantDictionaries?.count ?? 0 ) let decoder = JSONDecoder () decoder.dateDecodingStrategy = .secondsSince1970 let plants = plantDictionaries?.compactMap ({ Plant (dictionary: $0 , decoder: decoder) }) DispatchQueue .main.async { completionHandler (plants) } }, errorHandler: { error in os_log (.debug, log: .phone, "sending message failed: % s" , error.localizedDescription) }) }
iOS app 上处理 CoreData 和 Plant 类型的是一个 NSManagedObject 子类的对象。watchOS app extension 定义了它自己的 Plant 值类型,因为它并没有 CoreData 栈。为了将字典转换成值类型,我们可以使用 “Storing struct in UserDefault” 中描述的方法,只需要额外配置 JSONDecoder 使用的 dateDecodingStrategy 为 secondsSince1970 。理由是我们希望以自 1970 年之后的秒数来存储日期。转换字典到值类型的过程用到了 JSONSerialization ,它只支持 NSString , NSNumber , NSArray , NSDictionary , 或者 NSNull 。
1 2 3 4 5 6 7 8 9 10 11 12 13 14 15 struct Plant : Identifiable , Decodable , DictionaryDecodable let id: String let name: String let lastWateringDate: Date let nextWateringDate: Date } final class Plant : NSManagedObject , Identifiable @NSManaged var id: String @NSManaged var name: String @NSManaged var lastWateringDate: Date @NSManaged var nextWateringDate: Date }
第三步是在 iOS app 端处理消息,并且提供数据给 watchOS app 。我们需要做的是实现 session 的委托,从 CoreData 栈中获取字典数据。 先看下完整实现,然后逐一拆解。
1
2
3
4
5
6
7
8
9
10
11
12
13
14
15
16
17
18
19
20
21
22
23
24
25
26
func session (_ session: WCSession, didReceiveMessage message: [String: Any ], replyHandler: @escaping ([String: Any ]) Void ) { os_log (.debug, log: .watch, "did receive message: % s" , message [WatchCommunication .requestKey] as ? String ?? "unknown" ) guard let contentString = message [WatchCommunication .requestKey] as ? String , let content = WatchCommunication .Content (rawValue: contentString) else { replyHandler ([:]) return } switch content { case .allPlants: persistentContainer.performBackgroundTask { (managedObjectContext) in let all = Plant .allPlantsDictionaryRepresentation () as ! [[String : Any ]] let converted = all.map { (plantDictionary) -> [String : Any ] in plantDictionary.mapValues { (value) -> Any in if let date = value as ? Date { return date.timeIntervalSince1970 } else { return value } } } let response = [WatchCommunication .responseKey: converted] replyHandler (response) } } }
第一步是查看接收到的字典,看看 watchOS app 请求的是哪些内容。然后我们访问持久化存储,获取表示 Plant 的字典,把其他的日期转换成 1970 年后秒数的形式 (以便 watchOS app 能够在字典上使用 JSONSerialization),然后把数据发送回 watchOS app 。注意,从 CoreData 中获取字典形式的 Plant 很容易:我们首先是请求 NSDictionary 类型的数据,并且将结果类型属性设置为 .dictionaryResultType 。对于各庞大的模型,我们可能还会用到属性集合 (propertiesToFetch) 。不过目前,所有的属性都被添加到字典中了。
1
2
3
4
5
6
7
8
9
10
11
12
13
14
15
16
17
18
extension Plant static let entityName = "Plant" static func makeDictionaryRequest () NSFetchRequest <NSDictionary > { return NSFetchRequest <NSDictionary >(entityName: entityName) } static func allPlantsDictionaryRepresentation () NSDictionary ] { let request = makeDictionaryRequest () request.resultType = .dictionaryResultType do { return try request.execute () } catch let nsError as NSError { os_log (.debug, log: .plants, "failed fetching all plants with error % s % s" , nsError, nsError.userInfo) return [] } } }
用 SwiftUI 在 watchOS app 中构建 UI Xcode 中 watchOS app 的模板是借助 storyboard 初始化 HostingController, 这个控制器负责提供初始的 SwiftUI 视图。
1
2
3
4
5
6
7
8
9
10
11
12
13
class HostingController : WKHostingController <PlantListView > lazy private (set ) var connectivityProvider: PhoneConnectivityProvider = { let provider = PhoneConnectivityProvider () provider.connect () return provider }() private lazy var listViewModel = PlantListViewModel (connectivityProvider: connectivityProvider) override var body: PlantListView { return PlantListView (viewModel: listViewModel) } }
PlantListView 是一个显示植物列表的简单视图,它用 PhoneConnectivityProvider 的 refreshAllPlants (withCompletionHandler:) 来处理刷新植物的逻辑。 SwiftUI 视图会在 view model 改变时自动更新。这是因为 view model 的 plants 属性使用了 @Published 属性包装器,而 view model 本身是 ObservableObject ,这是 SwiftUI 视图中为 view model 采用的属性包装器 (更多信息可以阅读 refreshing SwiftUI view in MVVM in SwiftUI) 。注意,这里的 view model 是 SwiftUI 视图显现时刷新内容的。
1
2
3
4
5
6
7
8
9
10
11
12
13
14
15
16
17
18
19
20
21
22
23
24
25
26
27
28
29
30
final class PlantListViewModel : ObservableObject private let connectivityProvider: PhoneConnectivityProvider init (plants: [Plant ] = [], connectivityProvider: PhoneConnectivityProvider ) { self .plants = plants self .connectivityProvider = connectivityProvider refresh () } @Published private (set ) var plants: [Plant ] func refresh () connectivityProvider.refreshAllPlants { [weak self ] (plants) in guard let plants = plants else { return } self ?.plants = plants } } } struct PlantListView : View @ObservedObject var viewModel: PlantListViewModel var body: some View { VStack { List (self .viewModel.plants) { plant in PlantCell (viewModel: PlantCellViewModel (plant: plant)) } }.onAppear { self .viewModel.refresh () } } }
PlantListView 用 PlantCell 来显示独立的视图。
1
2
3
4
5
6
7
8
9
10
11
12
13
14
15
16
17
18
19
20
21
22
23
24
25
26
27
28
29
struct PlantCell : View let viewModel: PlantCellViewModel var body: some View { VStack (spacing: 4 ) { Text (viewModel.title).font (.headline).multilineTextAlignment (.center) Text (viewModel.subtitle).font (.footnote).multilineTextAlignment (.center) }.padding (8 ) .frame (minWidth: 0 , maxWidth: .greatestFiniteMagnitude) } } struct PlantCellViewModel let plant: Plant var title: String { return plant.name } private static let dateFormatter: DateFormatter = { let formatter = DateFormatter () formatter.dateFormat = DateFormatter .dateFormat (fromTemplate: "dMMMM" , options: 0 , locale: .current) return formatter }() var subtitle: String { let format = NSLocalizedString ("PlantCellView_NextWatering" , comment: "Next watering date." ) return String (format: format, Self .dateFormatter.string (from: plant.nextWateringDate)) } }
小结 我们在 iOS 和 watchOS app 上都添加 WCSessions ,实现相关的委托方法以处理 session 和接收到的消息。然后,我们定义一个简单的通信模式,并在 watchOS app 端实现刷新植物的方法,在 iOS 端实现 CoreData 集成。当数据访问创建完成后,我们在 watchOS app 上用 SwiftUI 视图显示植物的列表。
